Welcome to tutorial 1; manip cover; Bad Boy
first off you will need to be on Pixlr.com and have the images above open in new links :)
(ps you can just click on them and they will open in new links)
step 1; After you have pixlr open click on new image and set the size to 512 by 800
step 2; next you take pic one and copy the link then go onto pixlr and click on layer. After you click layer click open image url as layer then paste the link of pic 1; after that is done click on edit and free transform. Once you have clicked free transform click the shift on your key board and move the backgroud until it looks something like this. Then change the opasity to 60.


step 3; after you chaged the opacity it's time to add the second picture. Copy pic 2's link and click on the button layer layer then click open image url as layer and paste the link of pic 2; after that is done click on edit and free transform. Once you have clicked free transform move the backgroud until it looks something like this. I liked the way the chevoron looked squished and played a trick on your mind that it looked like it was going crooked so I didn't use shift. If you don't like that look then use shift. Then change the opasity to 60 also.
step 4; do the same for pic 3 with the link and url and paste and blah blah stuff. Except now on your screen it doesnt' look the same. That's becasue I squished the grid to be long and skinny. That's all I did. So I did the free transform button (with out using the shift) and made them skinny long rectangles. I don't have a specific size so go ahead and make them the size you find cute :)


step 5; after you have the small grid rectangle (at the opasity of 60 btw) then you just need to press on the layer button and click on the duplicate layer. After you duplicate the box you can move it (like I did) underneath the other rectangle and stack it in a staggered way (if that makes scense) just look at the way the picture looks below <3 I duplicated the rectangle 5 more times after the first and as you can see I put three rectangles on top and on the bottom.
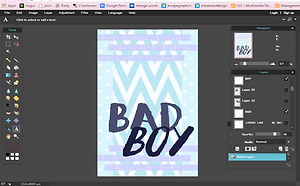
step 6; after you have the background you can add a new layer or not. That's your decision. Anyway, this is when you start on the title. Which the title is Bad Boy. So we will start with bad. I used the font SUMMERON on bold at size 130 (the highest size) using the color code :: 494c6e (if you copy that code you can paste it in where the other code for the color is.)


step 7; the next word is Boy. I used SUMMERON at size 130. Using the color code :: 1c2040 ... then I moved the 'boy' just barely above 'bad'
step 8; after the title is down next is for the author. At first I just had the author but the cover looked too plain so I decided to add "written by" SO, I wrote 'written by' in the color code:: 484c6b size 24
step 9; after you have written by type the author's name with the color coding :: 494c6e (just like the color from bad) and put the author name (wherever) under the title


step 10; okay this next part you can really play around with (well you can with all of it) but this is where all the color changing and hue replacing and all the suff <3 So take picutre number 4 and do what you did earlier to get the background. Except keep the opacity to normal. For Now. So you should be now have the model (or who ever you are using) after you have the model, and you resized her using shift you may begin changing the colors.
step 11; please ignore the second girl. I had to figure out the correct amounts of which color changes to do. So just follow the pictures (since this part of the cover you can really play round with the most ) if you want to have the same outcome as me.


step 12; after you changed and moved the girl to what you like (the color, size, and postion) then you can add the header. Which in this case is "Looks Can Be Decieving"
I used the color coding :: 9199bd size 16 font SUMMERON and spaced it so the words would be on both sides of the model's head. I also placed it on the line so it can flow with the background :)
step 13; after you have finshed the background, the title, the author, and the picture you can add your tag. I use ECCENTRIC- GRAPHICS with the font Times New Roman size 15 on every cover I make. I usually will take the background color and use either one shade darker or lighter for my tag. For this cover I used a lighter shade and put it on the strip above the header.
After you have made your cover (designed it) then save it to your computer. After you saved it to your computer upload it to Imgur.com ... you can collect all your covers there!! And pm me so I can see your covers!! <3 Thanks for using this and I hope it either helped you or showed you some new tools to use on pixlr :) Love you! <3
